
How to create Skeleton ring in solidworks

This is a circular shape with a hole feature consisting of a pentagon on the outer surface.
Let's create this skeletonized circle model step by step in Solidworks.
There is nothing special to do with this model, it's all simple modeling feature commands.
I believe you can follow the modeling steps provided below to create today's model quickly and successfully.
Okay, let's get started.
Step #1.On the front view, sketch 7 pentagons with the dimensions shown below:

Step #2.Then similarly, on the front view, sketch a rectangle. And create two points on the edges of the infinity shape created in the previous step, constraining the two points to coincide with the two edges of the rectangle. Label the dimensions of the rectangle.

Step #3.Go to the Surface command set and create a planar surface from the rectangle you created above.

Step #4.Trim Surface command, the trimming tool is Sketch 1, and the portion selected to be preserved is the yellow area.

Step #5.In the left side of the design tree, find “Annotations”, turn on the display of feature size, the effect of the following display effect.

Step #6.Linear pattern - bodies, choose Edge for Orientation and 10.39 for Spacing. pattern 3..

Step #7.Knit surface

Step #8.Insert--Features--Flex--Bending,180deg.


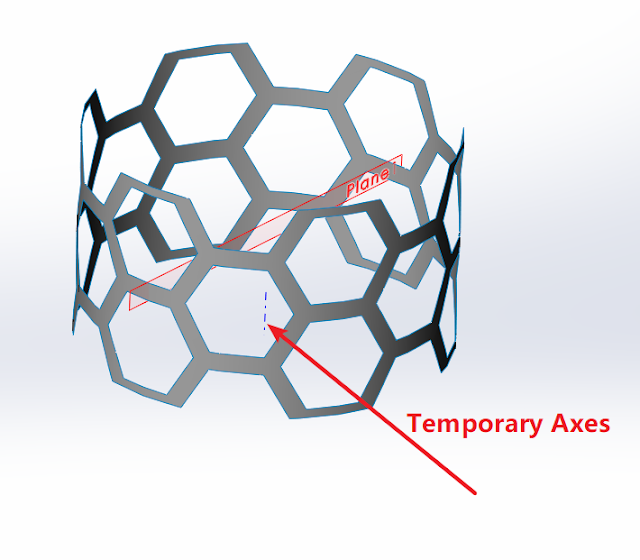
Step #9.New datum plane--Select these two edges on the screen。

Step #10.Mirror--bodies,select knit surface.

Step #11.View--hide/show--temporary axes. Linear pattern--bodies,direction 1--temporary axes,距离点选尺寸12.


Step #12.knit surface

Step #13.Flex--bending,360deg.

Step #14.Finish


0 Comments